I’ve been watching the old Nigella programmes, all the way from when she first started as a guest on Nigel Slater’s simple cooking to her later BBC shows. It is amazing how much she has changed….in her ‘Nigella Bites’ programmes she comes across as much shyer and definitely less sexual but now her name is almost synonymous with food porn. As my friend put it, I smell a bit of PR re-marketing. Nevertheless, I love her in all her guises and surprisingly she is the one who inspired this healthy version of chicken nuggets! As they are baked there is much less oil used and you can add any flavours you like to the breadcrumbs to vamp things up a bit. I’ve opted for a fresh Mediterranean feel with herbs, lemon and garlic.

For the Goujons:

You will need: 

250g Chicken Breast (sliced into goujons)

2 cups of bread crumbs

zest of 1 lemon

2 garlic cloves (finely chopped)

herbs de province (or any dry or fresh herbs you like)

1 egg (beaten)

spray oil

First mix the bread crumbs with the garlic, herbs and lemon zest. Then dip the chicken one by one into the beaten egg, followed by a coating of the breadcrumb mixture. Place the coated goujons onto a baking tray and spray them 6-8 times with the spray oil. Cook in a pre-heated oven at around 180 degrees centigrade for around 20-30mins or until they have turned golden brown.

Nutritional Information:

Calories:571 kcal

Fats: 14.2g

Proteins:65.2g

Carbohydrates: 48.6g

I LOVE YOU JAMIE OLIVER!! Haha…sorry I just had to get that off my chest, I feel much better now :D. If like me you have been watching “Jamie’s Great Britain” then you will know why I am suddenly having nostalgic cravings for pie and mash, Yorkshire puddings and Bakewell tarts. Unfortunately, British food often got a bad press in the past, mostly for being bland or boring, but it really isn’t. Thankfully Mr Oliver’s programme illustrates this point quite beautifully. Maybe it is the cold weather too but at the moment I can think of nothing else but meat, pastry, gravy and mash potatoes. So for those winter nights when it is pouring with rain outside, here is my (slightly posher) version of a Greggs steak bake; pure comfort in a pie :D.

For the Steak and Ale Pasty:

You will need:

250g beef frying steak

200g chestnut mushrooms (sliced)

1 beef stock cube

2 red onions (sliced)

1 cup of brown ale

2 garlic cloves (diced)

2 bay leaves

fresh/dried thyme

1 tbsp butter

1 sheet of ready rolled puff pastry

1 egg, beaten

1tbsp oil

1 heaped tbsp flour

First brown the beef in a casserole dish in a little oil. Remove the beef and put to one side. Next melt the butter in the pan with the beef fat and slowly fry the onions until golden brown. Then add in the mushrooms, garlic and thyme and fry a little more until the mushrooms as slightly softened. Return the beef to the dish and sift in the flour, stir well then add the ale, stock cube and bay leaves to the dish. Leave to simmer with the lid on a medium heat for around 1 hour or put in the oven at a low-medium temerature (around 160 degrees C) for the same amount of time. Once the beef is cooked leave to rest and cool down almost completely. Mean while cut the pastry sheet into two, then place onto a well floured surface. Add half the beef (avoiding too much liquid) onto one half of each of the pastry pieces. Brush around the edges with a beaten egg then fold over into a rectangle sealing the beef inside the pastry. Cut a few slits in the top and brush with beaten egg. Place the pasties onto a greased baking tray and cook in a preheated oven at 180 degrees C for around 30-40mins or until the pastry is golden brown. This serves 2 hungry people, or if you like you can divide your pastry to make 4 smaller pasties.

Nutritional Information:

For each large pasty

Calories: 788 kcal

Protein: 42.2g

Carbohydrates: 63.0g

Fats: 33.2g

I love Panettone and it has long been a staple cake in our house hold. However, the strange thing is, we never buy them, they just seem to turn up at any family celebration as if by magic. I think it’s because Ethiopians don’t really have traditional sweets, we tend to celebrate by cutting bread rather than cake and Panetonne is a kind of happy medium. We obviously have the Italians to thank for spicing up our dessert time; I always think that we were a little bit lucky (well, in a way) to be invaded by people who at least knew a thing or two about good cakes :D.

Panettone is also very versatile; recently my friend has been ordering the chocolate and orange version at Costa, which is a great variation of this classic and you can also make the leftovers into a fantastic bread and butter pudding.  However, all this thought about Panettone really got me thinking;I had no idea how it is made made. Therefore, in preparation for this coming Christmas I adapted this simple and impressive recipe so that we will definitely be seeing my fruity friend around this year.

For the Panettone:

you will need:

  • 1 tablespoon dried active baking yeast
  • 225ml warm milk
  • 4 tablespoons golden, caster sugar
  • 2 eggs
  • 125ml low fat natural yoghurt
  • 1 teaspoon vanilla extract
  • zest from 1 lemon zest
  • zest from 1 clementine
  • 1/4 teaspoon salt
  • 600 g (1 lb) plain flour
  • 100g mixed dried fruits and peel
  • 8 maraschino cherries (chopped)
  • 1 tablespoon icing sugar
  • 1 tsp melted butter (to brush, optional)

In a large mixing bowl, first add the yeast to the warm milk and caster sugar. Leave to one side for around 10 mins. Once the yeast has become frothy, add the eggs, yogurt, vanilla, lemon zest, clementine zest and salt to the mixture. Whisk together until well combined. Next stir in 500g of flour bit by bit until well incorporated. Sprinkle the rest of the remaining 100g of flour onto a work surface and knead the dough until smooth and not sticky, this can take up to 10 mins by hand. Alternatively you can do this in a bread maker. Leave to rise in an oiled bowl for around 1 hour covered in a tea towel.

Mean while coat the mixed fruit and cherries in the icing sugar. When the dough has risen punch it in the bowl 1/2 times then turn out onto a floured board and knead in the fruits. Then place in a 20cm, round cake tin that has been lightly greased. Cover loosely with an oiled layer of cling film and leave to rise until the dough has almost reached the top of the tin. This can take between 1-2hrs.

Once the dough has risen again, brush the top of the dough with melted butter or egg and place in a pre-heated oven at 180 degrees C for around 30-40 mins or unitl the top is golden brown and a skewer inserted into the middle comes out clean. If after 30 mins or so the top becomes too brown just cover with some tin foil for the remaining cooking time to stop it from burning. Once out of the oven, leave it to cool in the tin for a few mins, then turn out onto a wire cooking rack to cool completely. Once cool sprinkle with icing sugar for decoration. This recipe serves 12.

Nutritional Information:

For 1/12 of a panettone

Calories:262 kcal

Fat:2.2g

Protein:7.1g

Carbohydrates:52.9g

I have been trying to make the perfect Focaccia for years but my attempts have never been quite right. This notoriously wet dough is so tricky to handle and the temptation to add more flour is over whelming especially when kneading this dough by hand. However, I think I finally found the soulution: the bread maker. It is so easy, just bung in all the ingredients and let it do the work for u 😀 Although, if you don’t have a bread maker it is fine to use a bit of elbow grease just make sure you oil the board you are kneading the dough on instead of using flour. This method should prevent your dough from sticking and provide you with a delicious Focaccia complete with characteristic irregular holes in the middle. This recipe is from the Hairy Bikers book ‘Mums Know Best’ (which they certainly do), I’ve adapted the anchoiade topping a little bit and also included a sundried tomato version for those who are frightened of anchovies. I also discovered leftover anchoiade is pretty great with tomato sauce and pasta so don’t worry if you make a little to much, it also keeps in the fridge for ages.

For the Dough:

You will need:

2 tbsp olive oil

45og strong, white bread flour

1 tsp sea salt

7g dried yeast

275ml water

For the Anchoiade:

You will need:

10 green olives

3 cloves of garlic

2 tins anchovies in olive oil

2tsp olive oil

For the Sun-dried Tomato Topping:

You will need:

sundried tomatoes in oil

dried/fresh Italian herbs such as oregano or rosemary

To make the dough put all the ingredients in a bread maker and set to the ‘dough’ cycle. If you don’t have a bread maker combine all the dry ingredients in a large bowl adding the water gradually and kneading. When all the ingredients are combined transfer the dough to an oiled work surface and knead until smooth and elastic (this make take a while: around 5-10 mins). Once the dough is kneaded transfer to an oiled bowl, cover with cling film and leave to rise until double in size. Once the dough is ready, divide into 2 and stretch into a rectangle shape on an oiled baking tray. Cover and leave for another 30 mins.

Meanwhile prepare the anchoiade by combining all the ingredients together using a pestle and mortar or food processor until you have a smooth paste.

Once the dough has been left to rise for the second time cut a few holes in the bread as shown above. Next, on one of the breads spread over a thin layer of the anchoiade and on the other sprinkle on the sundried tomatoes and herbs. Drizzle with olive oil then cook in a pre-heated oven at 200 degrees C for around 25-30 mins.

This recipe makes 2 loaves.

Nutritional Information:

1/4 of Foccacia with anchoiade

Calories: 380 kcal

Fat:18.3g

Carbohydrates:39.1g

Protein: 15.5g

1/4 Foccacia with 3 sun-dried tomatoes

Calories: 236 kcal

Fat: 4.28g

Carbohydrates:41.4g

Protein: 7.1g

Happy Halloween Everyone!!! Above is a picture of my beautiful God Sister modelling her outfit for our first annual “Vintage, Leopard, Pumpkin Pie Party” which started off as us just wanting an excuse to dress up for Halloween but soon escalated into much more than that entirely. In the end we decided to get well into the spirit of things by purchasing a giant pumpkin and celebrating all the wonderful things it had to offer. Considering I bought my pumpkin for just £1, boy did I get my money’s worth. In fact I think I have fallen in love with the sheer value for money Pumpkins have to offer and also the range of things you can make with just one of these mammoth creatures.  So here is my tribute to my new orange friend ( I would recommended dividing the pumpkin in about 3 equal portions and removing the skin and seeds first):

1. Pumpkin Pie

For the Pastry:

You will need:

225g plain flour

110g butter

80g golden, unrefined caster sugar

1 large egg

1 tbsp water

For the Pie Filling:

You will need:

450g pumpkin flesh

1tsp nutmeg

1 1/2 tsp cinnamon

1 1/2 tsp all spice

1 tsp ground ginger

275ml double cream

3 eggs

75g soft, dark brown sugar

For Decoration:

cherries

whipped cream (the squirty kind) I used the reduced fat version from Asda which was pretty great actually.

To make the pastry crumble the butter and flour together making sure your hands and the ingredients are cold. When the mixture resembles bread crumbs, stir in the sugar and add the egg and water until you get a dough which is still quite dry and not sticky. Next cover the pastry in cling film and pop in the freezer for about 15-20 mins.

Meanwhile make the filling, steam the pumpkin flesh in a large colander above some boiling water in a sauce pan until soft and tender. Pour the flesh threw a sieve to get out some of the excess water and you should be left with a soft pulp. Add the cream, spices and sugar to a pan on a low heat and stir till you get a smooth sauce. Take the pan off the heat then leave to cool for 2 mins then whisk in the eggs one by one into the cream mixture. Finally add in the pumpkin flesh.

Next roll out the pastry on a floured surface into a circle that is approx 5-10 cm wider than your pie dish. Gently lift the pastry onto the pie dish then press down into the sides of the dish. Make sure that there is at least 5cm of excess pastry over the rim of your dish. Prick the base of the pastry all over with a fork then brush all over with a beaten egg/milk. Blind bake in the oven at 200 degrees for around 15- 20 mins or until golden brown. When the pastry is cooked, pour in the filling and cook at 180 degrees for 35-40 mins when the pie should be wobbly in the middle. Trim off the excess pastry on the top and serve with cream and a cherry on top for that vintage feel. This serves 10.

Nutritional Information:

Calories: 331 kcal

Fat: 17.1g

Protein: 5.7g

Carbohydrates: 36.8g

2. Thai inspired Pumpkin Soup

For the Soup

you will need:

1/3 pumpkin flesh cut into chunks

1 glass of milk

2 tsp Thai green curry paste

1 onion (diced)

1 tbsp oil

2 tsp brown sugar

Fry the onions in the oil until soft then add the green curry paste. Fry for about 1-2 mins then add the pumpkin, milk and sugar. Bring to the boil then leave to simmer with the lid on for about 15-20 mins or until the pumpkin is quite soft. Leave to cool a little then blitz with a hand blender or smoothie maker. Serve with a swirl of double cream. This serve 4.

Nutritional Information:

Calories: 110 kcal

Fat: 4.6g

Protein: 3.7g

Carbohydrates: 15.1g

3. Roasted Pumpkin with Cinnamon Sugar

You will need:

1/3 Pumpkin Flesh cut into chip shapes

2 tsp cinammon

2tsp caster sugar

1 tbsp olive oil

Coat the pumpkin in the oil and cinnamon. Roast in the oven for around 30 mins at 180 degrees. Once out of the oven sprinkle with sugar and serve with cream for a quick health dessert  or you can use salt instead for a savoury version. This serve 2.

Nutritional Information:

Calories: 138 kcal

Fat: 7.9 g

Protein: 2.3g

Carbohydrates: 19.5g

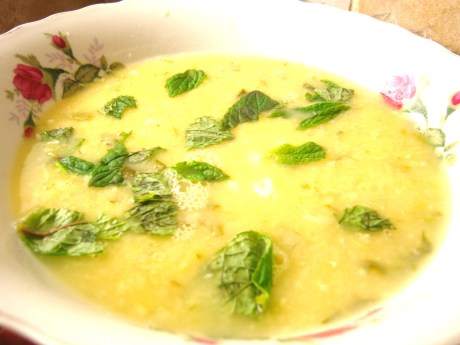
I love hummus and this dish is basically the liquid version. Also this soup is supper quick, cheap and healthy. I think it would also be great with some greek yoghurt plopped in the middle.

For the Soup 

You will need:

1 can of chickpeas (drained)

Juice 1 lemon

1 onion (diced)

2 cloves of garlic (crushed)

1 tbsp oilve oil

1 bunch of mint (chopped)

1 vegetable stock cube

1-2 cups of water

Fry the onions in the oil until soft. Next add the garlic, chickpeas, stock cube and water. Bring to the boil then leave to simmer on a low heat for about 5-10 mins. Add in the lemon juice then blend together using a hand blender or smoothie maker. Serve with chopped mint. (add salt and pepper to taste). This dish serves 2.

Nutritional Information:

Per Bowl:

Calories: 221 kcal

Fat: 8.8g

Protein: 7.0g

Carbohydrates: 26.7g

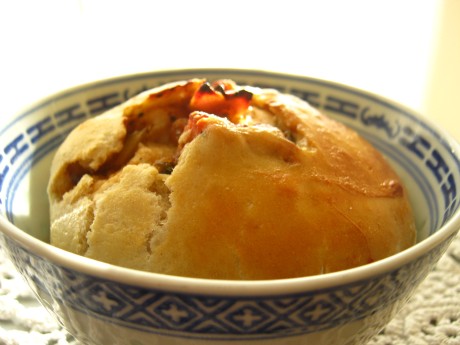
There is a bakery in China Town that sells all kinds of delicious stuffed buns ranging from sweet to savoury. There are buns filled with cheese, custard, coconut and pork so as you can imagine it is a sort of heaven for me. I have always liked the slightly alcoholic taste of their bread and tried to recreate it with this recipe which I think has actually worked quite well. You can use any filling you like but this bbq pork version is great and it is really good value for money.

For the Buns

you will need:

2 cups plain flour

8 g dry yeast

2 tbsp sugar

2 tsp vegetable oil

1/3 cup milk

1/2 cup hot water

1/2 tsp mirin

For brushing buns:

1 egg yolk, whished

1 tsp sugar

1tsp mirin

For the BBQ Pork:

you will need

2 Pork Chops

For the Sauce:
3 clove garlic (crushed)

1 1/2 tablespoons oil

3 tbsp honey

1 1/2 tbsp hoisin sauce

1 1/2 tbsp soy sauce

1 tbsp mirin

pinch black pepper (to taste)

1 tsp Chinese five-spice powder

1/2 tsp sesame oil

First mix all the ingredients for the dough together and kneed for about 10 mins until soft and smooth. If you have a bread maker this can do the work for you. Leave in an oiled bowl covered with a towel for about an hour till doubled in size.  Next warm all the sauce ingredients in a pan until smooth and sticky. Do this over a low heat. Marinade the pork chops in the sauce until the bread has risen or as long as you can (over night is probably best). Once marinaded cook the pork in the sauce under a medium-high grill, occasionally basting and turning the pork until it is quite sticky. Once cooked, cut the pork up into chunks and remove the bones. Once the bread has risen, knock the air out and roll into about 10 balls. Fill each one with about 1 tbsp of the pork mixture then cook at 200 degrees for around 15 mins, then brush with the egg yolk mixture and cook for a further 10 mins.

Nutritional Information:

Per Bun:

Calories: 242 kcal

Protein: 8.5g

Carbohydrates: 42.0g

Fat: 4.6 g

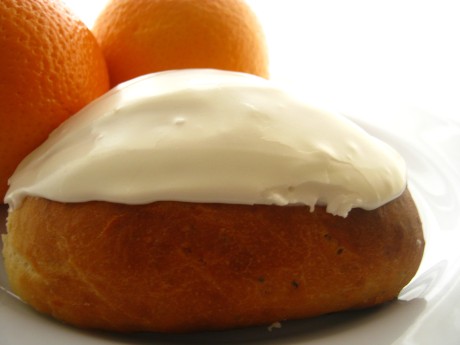
I was watching ‘The Great British Bake off’ recently and iced buns were one of the technical challenges. I have never been one for these traditional English Cakes but for some reason I found myself strangely drawn to their simple and nostalgic flavours. I tried to add a little modern twist by adding poppy seeds and orange zest just to vamp them up a little bit and I think they work. Great covered in cream and jam as part of an afternoon tea too! I have adapted this recipe from the BBC website.

For the Buns:

You will need

250g strong white flour, sifted

250g plain flour, sifted

125ml warm water

125ml warm milk

7g  fact-action dried yeast

2 tsp fine sea salt

50g caster sugar

1 orange, zest only

1  egg, beaten

50g butter, cut into cubes

1 tbsp poppy seeds

vegetable oil, for greasing

For the Icing

You will need:

50g icing sugar

2 tbsp orange juice

1 drop vanilla extract

With a fork mix together the flour, water, milk, poppy seeds, yeast, salt, sugar and orange zest in a large bowl and until all ingredients are incorporated. Next add the egg (beaten) and butter which should be at room temperature. Mix together until you get a sticky dough. Finally, knead the dough on a lightly floured surface until smooth and elastic, this takes about 5-10 mins by hand.  Place in an oiled bowl, cover with cling film and wait until it has doubled in size. After this time, knock back the dough by punching it one or two times and roll into about eight sausage shapes. Place quite close together on a greased baking tray and cover and leave to rise for a further half an hour. Once the buns have risen cook them in a preheated oven at 220 degrees C for 20-25 mins or until golden brown. Leave to cool completely on a wire cooling rack before icing.

To make the icing mix together  with the orange juice and vanilla essence. Stir together until the icing is smooth and spreadable but not to runny. Spread in a neat line using a knife over the iced buns as seen in the picture below. Serve with jam of your choice. This makes about 8 iced buns.

Nutritional Information 

For typical bun:

Calories: 270 kcal

Fat: 3.3g

Carbohydrates: 54.3g

Protein: 6.3g

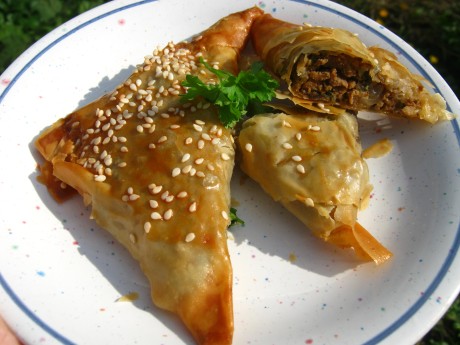
Borek is always a staple order for my friends and I when we visit any sort of mezze restaurant. As I have mentioned before, any sort of stuffed bread or pastry makes me so happy and I have always loved these little moreish parcels since I was a child. Strangely, this is the first time I have attempted to make my own and it was so simple that I wondered why I had never tried to make them before. I have chosen to make two fillings here: since most of my family are vegetarians I have opted for the traditional feta and herb stuffing as well as a spicy Quorn version. Actually, as a meat lover I was pleasantly suprised by the tastiness of the Quorn mince, it has a very good ability to soak up flavours plus it is much lower in fat, however if you do want to make a meat version lamb/beef is a very good substitute.

For the Borek:

You will need:

1 packet (about 100g) of filo pastry sheets

4 tbsp olive oil

1 beaten egg/some milk for glazing

sesame seeds (optional)

For the Cheese Filling:

You will need:

100g feta cheese

100g riccota cheese

50g grated mild cheddar/mozzarella

1 egg lightly beaten

1 spring onion, finely chopped

bunch of mint, finely chopped

bunch of parsley, finely chopped

1/2 tsp grated nutmeg

black pepper to taste

For the Quorn (or meat) filling:

You will need:

2 tbsp of olive oil

1 tsp butter

1 egg, ligthly beaten

1tsp ground ginger

1tsp paprika

1tsp ground coriander

1tsp ground cinammon

1 onion, finely chopped

fresh parsely, finely chopped

friesh corriander, finely chopped

2 garlic cloves, finely chopped

150g quorn mince

1 tsp ricotta (tip: you only really need to add this if you are using quorn mince as it is low in fat  and therefore a little dry, adding ricotta will therefore help to add moisture. If you don’t have any ricotta just add a bit more butter or olive oil.)

First make the cheese filling by mixing all the cheese filling ingredients together in a bowl. Put in the fridge to set for about 10 mins. To make the Quorn/meat filling, fry the onions in the oil till soft then add the garlic. Next add in the Quorn mince and spices and fry for a further 1 minute. Finally add the fresh herbs and take of the heat. Stir in the egg and leave aside. Next cut the filo into rectangular strips about 6 inches by 8 inches, or into 24 equal rectangles. Put a heaped teaspoon on one corner of the rectangle and fold it over to make a traingle shape. Keep folding the pastry over itself then seal the ends with oil. Place the boreks on a greased baking tray and glaze with milk or a beaten egg, sprinkle with seasme seeds for decoration. Cook in a preheated oven at 180 degrees C for around 30mins or until they are golden brown. Serve warm. This recipe makes about 12 of each filling.

Nutritional Information:

For one cheese borek:

Calories: 88 kcal

Fat: 4.8g

Protein: 9.1 g

Carbohydrates: 5.0g

For one Quorn borek:

Calories: 60 kcal

Fat: 5.0g

Protein: 3.0 g

Carbohydrates: 3.6 g

As a recent graduate and a lowly shift worker with limited funds, I am often looking for free and productive things to do in my copious amounts of leisure time. Thankfully this predicament lead me to rediscover the local library and in particular the cooking section. On my recent visit I discovered this book called “The Complete and Illustrated Food and Cooking of Africa and the Middle East” and honestly I think I have fallen in love! The title alone covers so much of  the type of cuisine I enjoy making as well as being diverse enough to include completely new cultures and dishes for me to experiment with. I think I have bookmarked nearly every page of this book so far and find myself unconsciously looking at the pictures before bed time. In fact, this particular picture below of a Jerusalem Cheese Cake called Kodafa almost brought me to tears (I really wish that was an exaggeration but it is not). I have been so inspired by this book filled with so many of my favourite middle eastern treats (sweets in particular) that I thought I should give it its own very special mention: it has definitely become my new food bible.